Welcome to Vbond
Aluminum Composite Panel (ACP/ACM) Installation: 10 Key Steps from Start to Finish
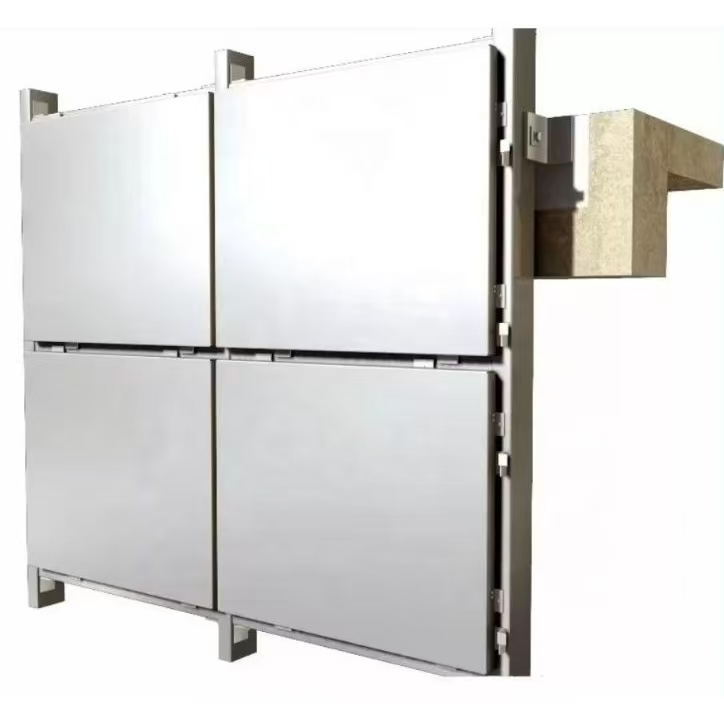
The quality of aluminum composite panel(ACP/ACM) installation directly determines its appearance, lifespan, and safety performance. Whether it's curtain wall hanging, interior installation, or signage installation, common issues such as improper base preparation and inadequate sealing must be avoided. The following examines 10 key considerations from the four stages of pre-installation, installation process, detailing, and acceptance criteria to help you avoid rework and safety hazards.
I. Pre-installation Preparation: Three Essential Prerequisites
1. Base Preparation: Ensuring a "flat, solid, and dry" surface is crucial.
- The wall base (concrete/brick wall) must be checked with a 2m straightedge to maintain a flatness tolerance of ≤3mm. Protrusions should be smoothed and recesses leveled with cement mortar (strength ≥ M10). Failure to do so will result in bulges or uneven joints after installation. - The wooden base (interior partitions) must be treated with an anti-corrosion coating (apply two coats of anti-corrosion paint) and have a moisture content of ≤12% to prevent wood deformation and cracking of the aluminum-plastic panel. The metal base (keel) must be derusted (sandpapered and then painted with anti-rust paint). In coastal areas, additional galvanizing is required to prevent corrosion from sea breezes.
- The base surface must be dry. Concrete walls must be cured for at least 28 days, and newly plastered walls must be cured for at least 7 days. A damp base can cause the adhesive to fail and cause delamination.
2. Material Compatibility: Select the appropriate auxiliary materials based on the installation method.
- For dry-hanging installation (curtain walls/high-rise exterior walls): Use hot-dip galvanized square steel (size ≥ 50×50×3mm) or aluminum alloy keel (6063-T5 series). Use stainless steel hangers (304 or 316, 316 for coastal areas). Ordinary carbon steel hangers are strictly prohibited because they are prone to rust and breakage. - Adhesive Installation (Indoor Walls/Ceilings): For indoor installation, neutral silicone structural adhesive (bond strength ≥ 0.6MPa) or epoxy adhesive is preferred. For outdoor installation, weather-resistant silicone adhesive (UV-resistant, no deformation from -50°C to 150°C) is required. Acidic glass glue is prohibited (it corrodes the aluminum sheet and has poor weather resistance).
- Material Cutting: Aluminum composite panel should be cut using a dedicated panel cutter (with a diamond saw blade). The core material should be facing downward during cutting to prevent chipping of the aluminum sheet. Curved panels should be processed using a hot bending machine (controlled at a temperature of 120°C-150°C). Direct cold bending is prohibited (it can easily crack the aluminum sheet and cause the coating to peel).
3. Environmental Control: Avoid inclement weather and unsuitable temperatures.
- Outdoor Installation: Refrain from installation if the temperature is below 5°C or above 35°C. Low temperatures will slow the curing of the adhesive (inadequate bonding strength), while high temperatures will accelerate adhesive aging. Installation is prohibited on rainy or windy days (wind force ≥ level 5). Rain will affect the dryness of the substrate, and strong winds will cause misalignment during panel installation. - Indoor Installation: Ceiling installation should be performed after plumbing, electricity, and fire protection piping is complete to avoid damage to the pipes caused by subsequent drilling. For humid environments (such as bathrooms and kitchens), the base layer should be waterproofed (apply two coats of waterproof paint) before installing the aluminum composite panel to prevent moisture from penetrating the core material.
II. Core Installation Process: Four Key Steps Determine Stability
1. Securing the Balusters: Spacing and Stiffness are the Bottom Line for Safety
- Dry Hanging Baluster Spacing: Main bascule spacing (vertical) ≤ 1.2m, secondary bascule spacing (horizontal) ≤ 600mm (for panel width ≤ 1220mm). Excessive spacing can cause the aluminum composite panel to sag and deform under load, especially in large-span outdoor installations (such as shopping mall facades).
- Fixing Method: Expansion bolts must penetrate the base layer ≥ 50mm (for concrete bases) or through-wall bolts (for brick walls). Bolt spacing must be ≤ 500mm, and at least two bolts must be used at each bascule joint. Nail fastening is prohibited (only suitable for temporary fixation and prone to loosening over time). - Leveling of the purlins: After installation, use a spirit level to calibrate the verticality of the main purlins to ≤3mm/2m, and the flatness of the secondary purlins to ≤2mm/2m. After leveling, secure the purlins to avoid uneven heights during later installation.
2. Gluing/Dry Hanging the Panels: Ensure seamless installation and no hollows.
- Gluing Installation (Indoors): Use a combination of spot gluing and full gluing. Apply adhesive to ≥70% of the surface area. For spot gluing, ensure the diameter of the glue dots is ≥30mm and the spacing is ≤200mm. After gluing, tap evenly with a rubber hammer to expel air and ensure there are no hollows. (You can tap gently with a small hammer. A crisp sound indicates acceptance, while a dull sound indicates hollowness.) Dry-hang installation (outdoor): 5mm-8mm expansion joints must be left at the edges of the panels to accommodate thermal expansion and contraction. Use stainless steel self-tapping screws (diameter ≥ 4mm) to connect the hangers to the panels. Screw spacing should be ≤ 300mm, and the screws must penetrate the aluminum sheet ≥ 5mm. Do not screw them only into the core material (they may fall off). Each panel must be secured with at least four hangers (≥ 6 for large panels).
- Joint Treatment: The width of joints between adjacent panels should be controlled to 3mm-5mm. Outdoor joints should be caulked with weather-resistant silicone sealant (with a joint width-to-thickness ratio of 1:1.5, e.g., 5mm width, 7.5mm thickness). Before caulk, remove any dust from the gaps. The glue surface must be smooth and flat, free of bubbles or cracks. Indoor joints can be left natural or filled with a matching sealant.
3. Corner Treatment: Avoiding the Hazards of "Warping and Cutting"
- External Corner Treatment: Preferably wrap with specialized aluminum alloy external corner strips (thickness ≥ 1.5mm), or fold the aluminum-plastic panel (fold width ≥ 20mm). Structural adhesive should be used to reinforce the folded edges. Direct splicing is prohibited (as it can easily warp). External corner gaps should be sealed with glue to prevent rainwater infiltration.
- Internal Corner Treatment: After folding the panel, attach it to the base layer and secure with screws (spacing ≤ 300mm). When filling the internal corner gap with glue, allow 2mm of expansion and contraction to prevent cracking due to temperature fluctuations.
- Cut Edge Treatment: Exposed cut edges (such as the edges of advertising logos) should be sanded smooth (rounded), or affixed with specialized aluminum-plastic panel edge banding to prevent the aluminum sheet from cutting your hands and moisture from penetrating the core material.
4. Special Area Treatment: Doors, windows, and openings are key to waterproofing.
- Around door and window openings: The aluminum composite panel must extend ≥10mm into the inside of the door and window frame, leaving a 5mm expansion joint between the panel and the frame. Use weather-resistant adhesive to seal the gap (the joint must cover both the aluminum composite panel and the door and window frame by ≥5mm) to prevent rainwater from seeping into the interior.
- Top/bottom of the curtain wall: A water retaining plate should be installed at the top (inclined 5°-10° outward to prevent water accumulation). Drain holes should be provided at the bottom (spacing ≤1m, hole diameter ≥10mm). These holes should be covered with stainless steel mesh to prevent clogging and mold in the core material.
- Pipeline crossings: The panel opening should be 10mm-15mm larger than the pipeline diameter. Use sealant (≥5mm thick) to seal the edges of the opening. Use flexible waterproof tubing to connect the pipeline to the panel to prevent cracking in the joint due to pipeline vibration.
III. Post-Installation Inspection: Three Criteria for Verifying Installation Quality
1. Appearance Inspection: Smoothness, No Color Difference, No Damage
- Use a 2m straightedge to check the surface flatness of the panels, with an error of ≤2mm/m; the height difference of the joints ≤0.5mm, and the gap width uniform (deviation ≤0.5mm).
- The color difference ΔE of the panels within the same area is ≤1.5 (not noticeable to the naked eye). The coating is free of scratches, bubbles, or peeling, and the edges and corners are free of warping or deformation.
- The glue joint surface is smooth and flat, free of bubbles, glue breaks, or dents. The glue joint width and thickness meet the design requirements, and there are no excess glue stains (residual glue stains can be cleaned with alcohol).
2. Firmness Inspection: No looseness or hollows
- Gently push the panels (dry hanging) to ensure no noticeable wobble; manually bend the edges and corners to ensure no warping or looseness; tap the installed panels with a hammer to ensure no hollows (a hollow area of ≤5% is acceptable). - Check the connection between the keel and the base layer. Use a wrench to tighten the expansion bolts and ensure they are not loose. The hangers are securely connected to the keel and panels, and the screws must not be stripped or falling off.
3. Waterproofing Acceptance (Outdoor): Simulated Rainwater Test to Ensure No Leakage
- Use a high-pressure water gun (0.3 MPa) to spray the outdoor wall for 30 minutes (focusing on joints and around doors and windows). After 24 hours, inspect the corresponding indoor areas. No signs of water seepage or moisture are considered acceptable.
- Check the drainage holes for unobstructed flow. After spraying water, observe the drainage holes for signs of blockage and water accumulation. Acceptable.
IV. Post-Installation Maintenance: Two Precautions to Extend Service Life
1. Within 7 days after installation (during the adhesive curing period), avoid impacting or squeezing the panels to prevent uncured adhesive from causing them to shift. Avoid hanging heavy objects on the panels for 1 month after outdoor installation. 2. For daily cleaning, use a neutral detergent (such as dishwashing liquid) and a soft cloth. Avoid using strong acidic or alkaline cleaners (such as hydrochloric acid or strong alkaline detergents) or steel wool to prevent corrosion of the coating. In coastal areas, remove salt from the panel surface every six months to extend weather resistance.
Summary
The key to aluminum composite panel installation is a strong base, appropriate auxiliary materials, meticulous workmanship, and rigorous waterproofing. Especially for outdoor curtain walls and high-humidity environments, special attention should be paid to the strength of the keel, the weather resistance of the sealant, and the provision of expansion joints. For indoor installation, attention should be paid to flatness and environmental friendliness. It is recommended to select a team with at least five years of construction experience, sign a detailed contract before installation (specifying workmanship standards and a warranty period of ≥5 years), and conduct inspections at key points during installation to ensure quality from the very beginning.